VScode is by far the most popular IDE tool that is used by developers and devops engineers. It provides really great features and functionality. One of the things that you can do inside of vscode is change the integrated shell, which allows you to customize which shell is used inside the IDE itself. Let’s see how to change the integrated shell in vscode and the steps needed to do this.
Brief overview of VSCode
In case you haven’t heard about VSCode (unlikely), what is it exactly? It is a free integrated development environment (IDE) from Microsoft that you can download and use totally free without strings attached. It provides most if not all the functionality that most DevOps and light development work will need.
Also, it has tons of integrations, extensions, themes, and more community goodies to note that make coding and developing in this environment extremely easy. You can take a look at and download VSCode here: Download Visual Studio Code – Mac, Linux, Windows.
Why worry about the default terminal?
Each terminal has its unique set of capabilities and features, including syntax specific to the command environment. Depending on the type of code you are working on or the features in the shell you are looking to have, changing the default terminal may be beneficial.
Changing the Default Shell in Visual Studio Code
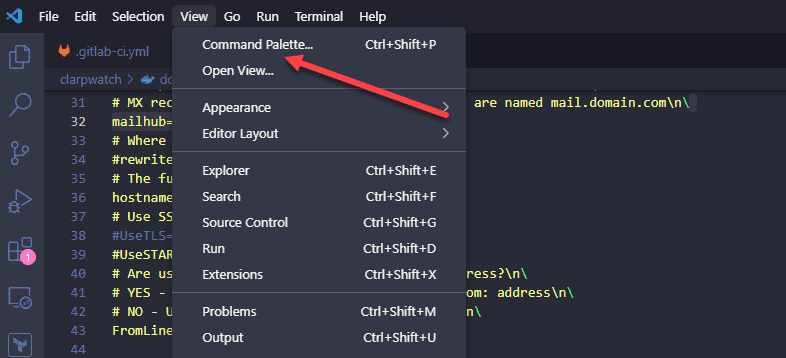
The steps to change the default shell in Visual Studio Code development environment are fairly simple. To change the default shell, press the CTRL+SHIFT+P or select View > Command Palette.
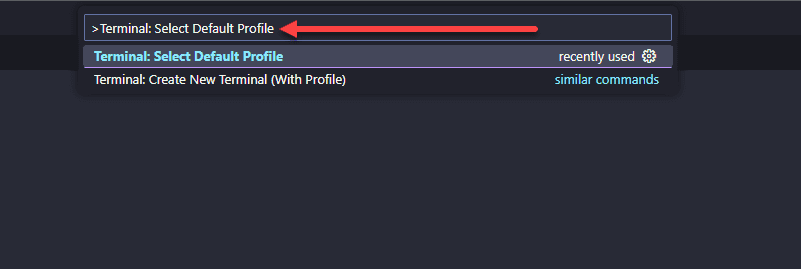
Type in the command:
Terminal: Select Default ProfileOnce you type this in, click the select default profile command in the dropdown for Terminal: Select Default Profile.
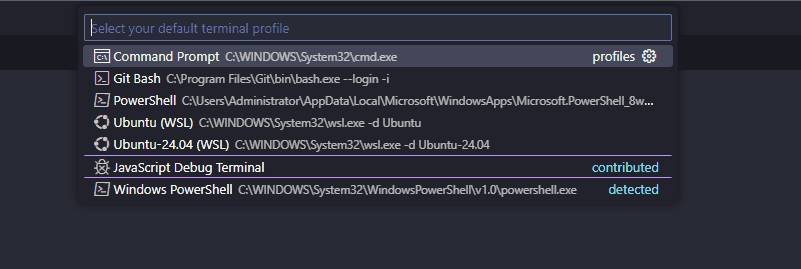
This will launch the terminal dropdown displaying all the terminals you have available to choose from, so you can select default shell. As a note, this queries the available terminals on your local workstation that you have access to. You can see I have:
- Command prompt
- Git bash
- PowerShell
- Ubuntu WSL
- ubuntu-24.04 WSL
- Javascript Debug Terminal
- Windows PowerShell
So, these are reading from my local Windows workstation.
Checking the current default integrated terminal
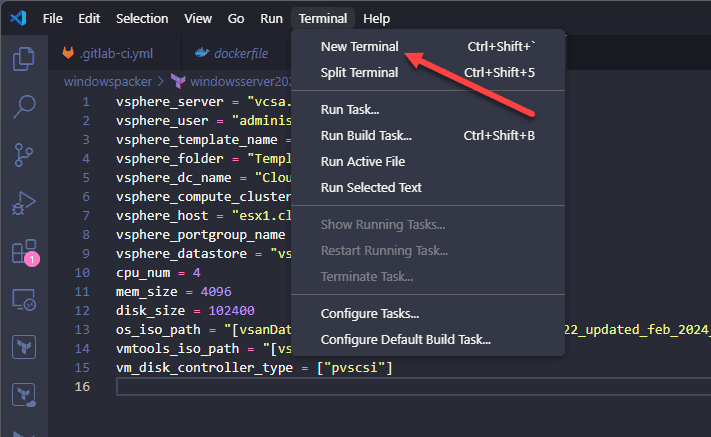
You can check to see the default terminal if you view your Terminal Window: to view the terminal window, click Terminal > New Terminal. You can also use the keyboard shortcut CTRL+SHIFT+`
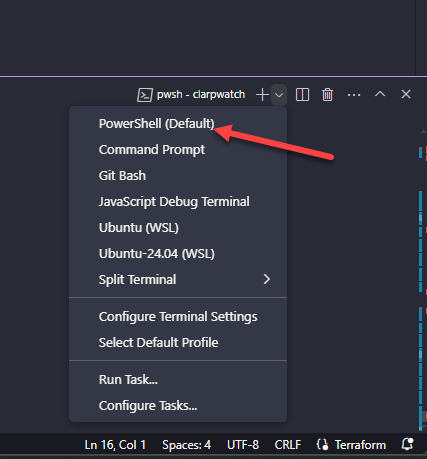
This will open a new terminal window. Once you have a terminal window open in VSCode you can click the drop down on the right-hand side and see the list of terminals here and see which one has the designation of (Default) in the dropdown.
Configure the integrated terminal in VSCode using the settings.json file
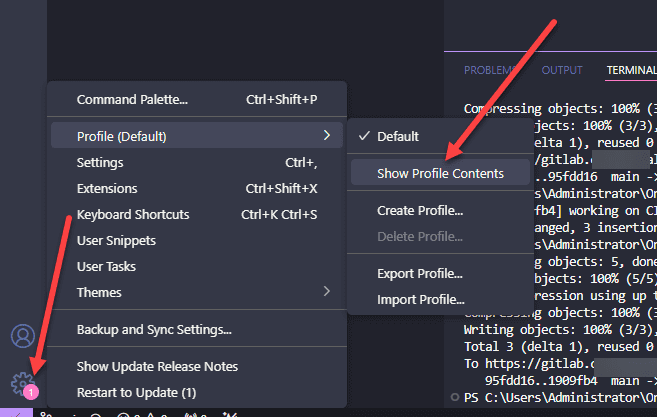
You can also configure the terminal profile by editing the JSON file and adding the “terminal.integrated.defaultProfile.windows” setting. To edit your settings.json file where this setting in configured, navigate to your “settings cog” in the lower left-hand corner, click Profile (Default) > Show Profile Contents.
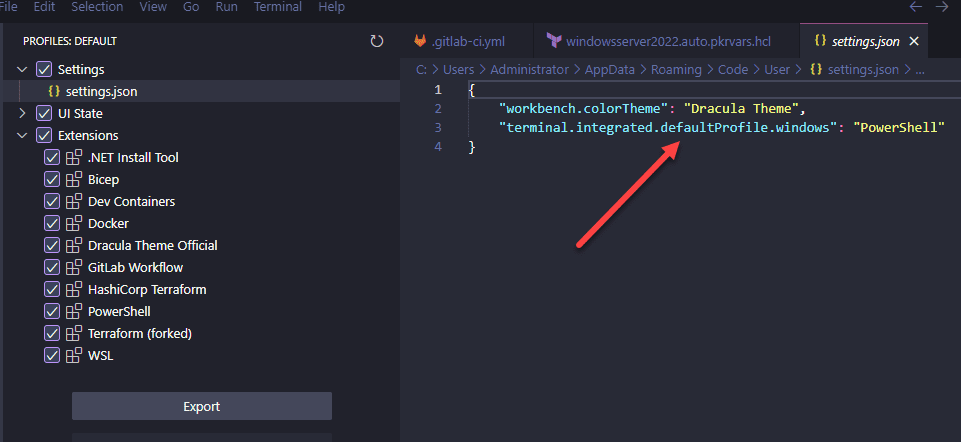
When the settings.json file opens, you will see this setting configured, which you can change in the file and save.
Troubleshooting and Advanced Configuration
If you’re having trouble changing the default shell, try checking the terminal panel for any error messages. You can also try enabling shell integration by setting terminal.integrated.enableShellIntegration” to true in your settings.json file. To set a preferred shell, you can add the “terminal.integrated.defaultProfile.windows” setting to the settings.json file and configure the executable path of your preferred shell. For advanced configuration options, you can refer to the VS Code documentation on terminal profiles and shell integration.
Here are some other things to try:
Shell Not Listed
If your shell that you want to use is not listed in the terminal dropdown:
- Check Installation: Make sure the shell is installed on your system. As an example, Git Bash can be downloaded and installed from the official Git website.
- Restart VS Code: Sometimes, a simple restart can make newly installed shells appear in the list if there is an underlying issue going on.
Shell Not Opening
If the shell you selected does not open:
- Executable Path: Verify the executable path in your settings.json file. The path should point to the executable file for the shell.
- Permissions: Ensure you have the necessary permissions to execute the shell. On Windows, running VS Code as an administrator might resolve this issue.
Default Shell Not Persisting
If VS Code does not remember your selected default shell:
- Update Settings: Make sure you’ve saved the changes in the settings.json file. Use the terminal.integrated.defaultProfile.windows (or appropriate platform) setting to configure your default shell to be used.
- Profile Conflicts: Check to see if there are conflicting profiles that might override your settings you are expecting.
Unexpected Behavior
If the integrated terminal behaves in a way that is unexpected:
- Disable Extensions: Extensions might interfere with the terminal. Try disabling extensions to see if the issue goes away.
- Check for Updates: Make sure you are running the latest versions of both VS Code and your shells.
Wrapping up
VSCode is my choice of IDE when it comes to working with DevOps code and other processes. It has a ton of features, integrates with git workflows very well and there are lots of extensions to choose from. Also, as we have seen, you can change integrated shell in VSCode to fit your needs and work with the command shell environment you want to work with that makes sense for your code. Using the interface, you can easily change the default terminal using the command palette or using the settings.json file to set the default profile for your terminal there.

