
If you are looking for a solution to monitor Ethernet address changes in your network, arp monitoring is a great way to do this. ARP or address resolution protocol is the protocol that sends out an arp request. there is a solution called Arpwatch that allows monitoring your network for these requests and it can use them to alert you when new addresses appear on your network.
What is arpwatch?
First of all, what is arpwatch? It is a free and opensource tool you can download and easily install in Linux or in a Docker container and can be used to monitor Ethernet activity on a computer network. It keeps track of IP address pairings with ARP activity. So, it knows which IP addresses have which mac addresses.

If an IP address or mac address appears on the network that isn’t noted as a recorded pairing, Arpwatch will send out an alert and note the change in address or new address that has appeared. If you already have multiple IP addresses on the network, it keeps these in an arp cache to know which devices are already on the network so you aren’t spammed with messages, only new addresses or changed addresses that come across with arp requests from a new device.
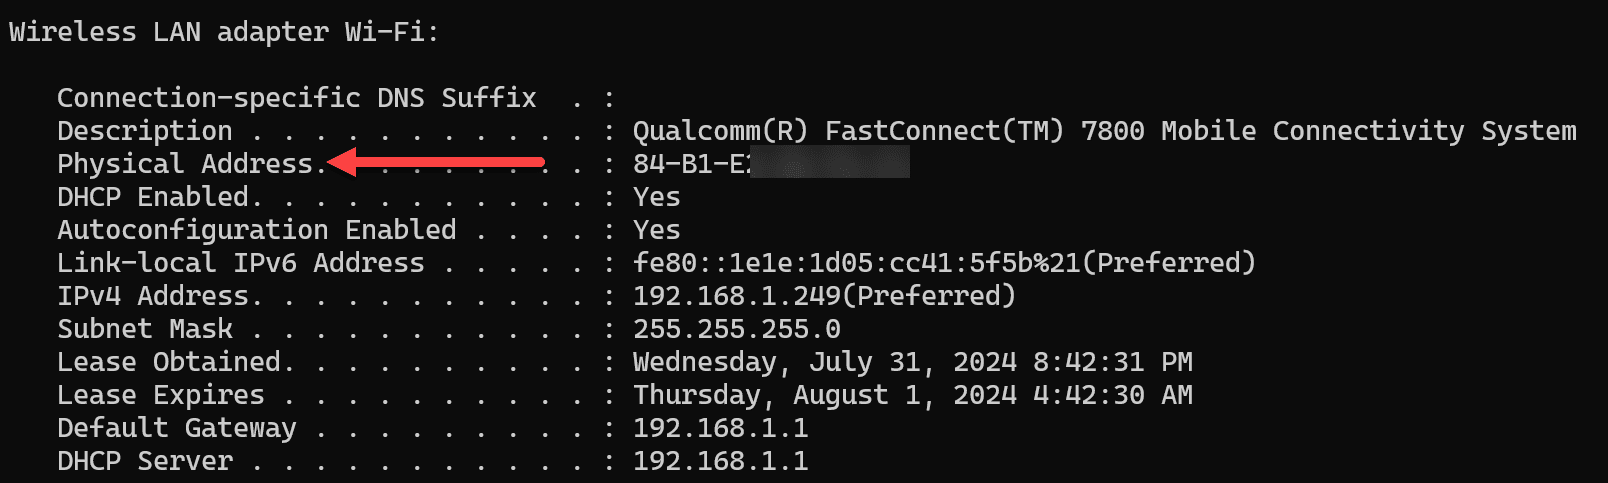
Below is an example of seeing the MAC address and IP address. In Windows 11 below, I have issued the command:
ipconfig allThis command with the all option will show the mac address and other verbose information about your connection. Arpwatch will record this physical address pairing with the IP address.
The arpwatch tool is extremely useful for detecting network attacks such as ARP spoofing or MAC address spoofing as it will see this activity on the network and alert. If you are a system administrator, security professional, or network administrators getting familiar with arpwatch is a great way to bolster your network security.
Installing and Configuring Arpwatch
You can install it on most Linux distros using the package manager for that particular distro. With Debian, you can use the command:
sudo apt-get install arpwatchThe default location for the arpwatch conf file is:
/etc/arpwatch.confYou can start the arpwatch service with the service command:
service arpwatch startUnderstanding MAC Address Changes
The MAC address for a device is a unique address that is assigned by the hardware vendor. The mac address of a device doesn’t change (there are software tools to do this), but for the purposes of what we are talking about, these hardware addresses don’t change.
When a MAC address “changes” what we are really saying is the device that is configured with a specific IP address has changed. Arpwatch helps a system administrator identify and investigate these types of changes, especially if these are out of the ordinary or unexpected.
Arpwatch command line options
There are several command line options to be aware of. The -n option means it won’t resolve hostnames. The -r option runs Arpwatch in read-only mode and doesn’t write to the database. The -f option configures a different location for the ARP database file. You can also of course send email alerts and notifications, which is an important component of the solution.
Arpwatch Docker Container
You can also run Arpwatch in a Docker container. This is a little project I have worked on recently and come up with a solution to run arpwatch in an Ubuntu 22.04 Docker container. The Dockerfile I have created, installs a few tools and utilities to allow working inside the container, but can be stripped out if needed and when you have everything working.
Below is my current Dockerfile. I will attempt to explain the important parts to give context to the Dockerfile comments:
- Install required packages – In this section we are installing several packages, including arpwatch, ssmtp (email alerts), mailutils (email alerts config), vim, sudo, systemd, iproute2
- Add configurations for arpwatch – In this section, we are adding the configuration for the interfaces we are going to monitor with Arpwatch. here we are configuring the interface names and subnets these will monitor. I am here using Mailrise and sending the alerts to pushover, push notifications
- Use sed to replace the INTERFACES line – this configuration places the interfaces we want to monitor in the configuration file located at /etc/default/arpwatch
- Add configurations for ssmtp – Here we are setting the SMTP server (my mailrise container) and the aliase configuration
- RUN echo”# Config file for sSMTP sendmail – This is more configuration for SMTP. Here I am echoing in the entire file for /etc/ssmtp/ssmtp.conf
- Ensure permissions for log directory – Setting permissions and making sure these are correct for the log directory
- Create a systemd service file to handle arpwatch initialization – This section creates, enables, and then starts the arpwatch services that will monitor the interfaces
- Enable the initialization service – Enable the arpwatch init service
- Configure systemd – Command and Entrypoint for the container
FROM ubuntu:22.04

ENV container=docker

# Install required packages
RUN apt-get update && \
    apt-get upgrade -y && \
    apt-get install -y arpwatch ssmtp mailutils vim sudo systemd iproute2 && \
    apt-get clean && \
    rm -rf /var/lib/apt/lists/*

# Add configurations for arpwatch
RUN echo "ens224 -a -n 192.168.1.0/24 -m [email protected]\n\
ens256 -a -n 10.3.33.0/24 -m [email protected]\n\
ens161 -a -n 10.2.22.0/24 -m [email protected]\n\
ens192 -a -n 10.1.149.0/24 -m [email protected]" \
    >> /etc/arpwatch.conf

# Use sed to replace the INTERFACES line
RUN sed -i 's/^INTERFACES=".*"/INTERFACES="ens192 ens224 ens256 ens161"/' /etc/default/arpwatch

# Add configurations for ssmtp
RUN echo "root:[email protected]:10.1.149.19:8025" >> /etc/ssmtp/revaliases

RUN echo "# Config file for sSMTP sendmail\n\
#\n\
# The person who gets all mail for userids < 1000\n\
# Make this empty to disable rewriting.\n\
[email protected]\n\
# The place where the mail goes. The actual machine name is required no\n\
# MX records are consulted. Commonly mailhosts are named mail.domain.com\n\
mailhub=10.1.149.19:8025\n\
# Where will the mail seem to come from?\n\
#rewriteDomain=gmail.com\n\
# The full hostname\n\
hostname=netwatch\n\
# Use SSL/TLS before starting negotiation\n\
#UseTLS=No\n\
#UseSTARTTLS=No\n\
# Are users allowed to set their own From: address?\n\
# YES - Allow the user to specify their own From: address\n\
# NO - Use the system generated From: address\n\
FromLineOverride=YES" > /etc/ssmtp/ssmtp.conf

# Ensure permissions for log directory
RUN mkdir -p /var/log && chown -R root:root /var/log

# Create a systemd service file to handle arpwatch initialization
RUN echo "[Unit]\n\
Description=Arpwatch Initialization Service\n\
After=network.target\n\
\n\
[Service]\n\
Type=oneshot\n\
ExecStart=/bin/bash -c 'systemctl enable arpwatch@ens192 && systemctl enable arpwatch@ens224 && systemctl enable arpwatch@ens256 && systemctl enable arpwatch@ens161 && systemctl start arpwatch@ens192 && systemctl start arpwatch@ens224 && systemctl start arpwatch@ens256 && systemctl start arpwatch@ens161'\n\
RemainAfterExit=yes\n\
\n\
[Install]\n\
WantedBy=multi-user.target" > /etc/systemd/system/arpwatch-init.service

# Enable the initialization service
RUN systemctl enable arpwatch-init.service

# Configure systemd
STOPSIGNAL SIGRTMIN+3
CMD ["/lib/systemd/systemd"]
ENTRYPOINT ["/lib/systemd/systemd"]
Run the docker container
You will need to build and run the Docker container from the Dockerfile shown above and of course customized for your environment.
docker build . -t arpwatch:latestThen run the resulting container. Note the options:
- Running it as a privileged container
- Network is set to host since we want to capture ARP requests on the actual host interfaces we have configured
- Also, we are setting a volume mount in the current directory for varlib-arpwatch and this will be mounted in a directory of the same path inside the container. This will contain the dat files that house the actual ARP mappings.
docker run -dit --privileged --network host --restart always -v $(pwd)/varlib-arpwatch:/var/lib/arpwatch --name arpwatch arpwatch:latest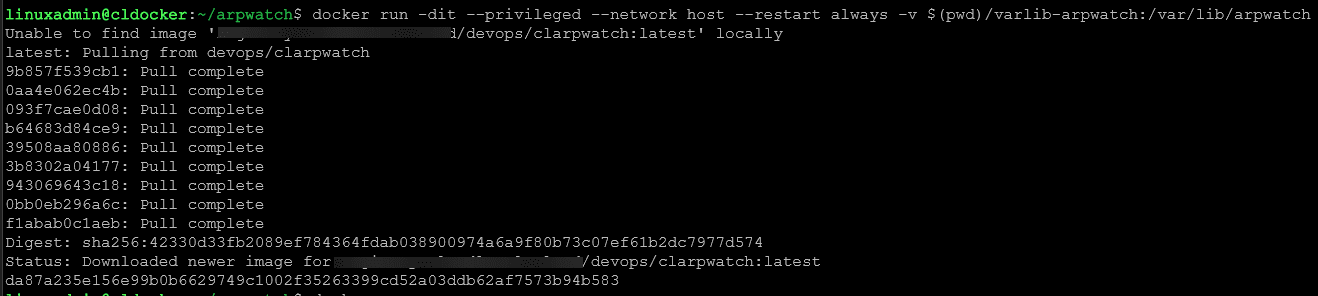
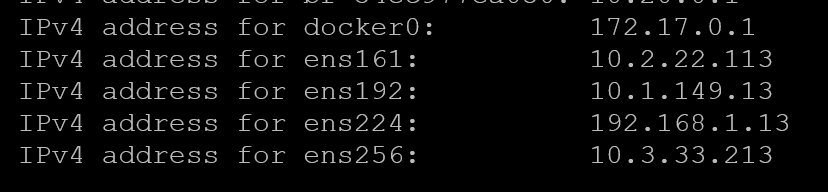
If you look at the varlib-arpwatch directory, you will see a DAT file for each interface you are monitoring.

Exec’ing into the arpwatch container and checking services
You can issue the command:
docker exec -it arpwatch /bin/bashThen look at the service, using the command (replace your interface with what is configured in your enviornment):
systemctl status arpwatch@ens192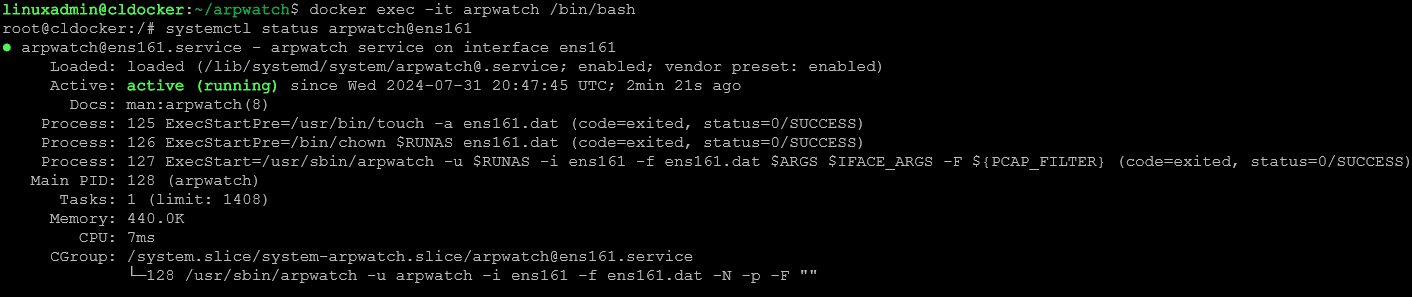
Wrapping up
I have been using arpwatch to monitor networks for a few years now and it hasn’t let me down. Aside from network security, it will help with day-to-day things like, “which IP did the device I just plugged in grab?” even if you aren’t next to your DHCP console. You will get an alert from your alerting configured.
Also, it will come in handy as well if you have an IP conflict on the network as you will see the “flip flop” messages come through with the two devices fighting over the IP address. So, there are many great capabilities and real-world benefits to standing up arpwatch. An arpwatch docker container helps to make the process to use arpwatch extremely easy and allows you to easily keep the container updated and deployed out across your environments.